How to Make Homemade Spinach Noodles: Vegan & Nutrient-Rich
There's a special kind of satisfaction that comes from creating something delicious from scratch in your own kitchen. And when that creation is not only incredibly tasty but also vibrant, nutritious, and naturally vegan, it's an even greater triumph. We're talking about homemade spinach noodles – a beautiful, emerald green pasta that promises to elevate any meal. Forget the bland, store-bought options; learning how to make spinach noodles at home is a rewarding journey into fresh, wholesome eating that even the pickiest eaters might just fall in love with.
This comprehensive guide will walk you through every step of transforming simple ingredients into a dazzling pasta dish. We'll explore the best techniques, essential tips, and creative ways to serve your freshly made green pasta. Get ready to impress your taste buds and your dinner guests with this incredibly easy 3-ingredient green pasta that's packed with goodness.
Why Choose Homemade Spinach Noodles? Beyond the Green Hue
While the striking green color of spinach noodles is undoubtedly a feast for the eyes, the benefits extend far beyond aesthetics. Opting for homemade spinach pasta brings a wealth of advantages to your table:
- Nutrient Powerhouse: Spinach is renowned for being rich in vitamins A, C, and K, as well as folate, iron, and magnesium. By incorporating spinach directly into your pasta dough, you're boosting the nutritional profile of your meal, making it a clever way to "eat your greens" without even noticing.
- Unbeatable Freshness and Flavor: There's simply no comparison to the taste and texture of freshly made pasta. The delicate chewiness and subtle, earthy flavor of spinach-infused dough are far superior to dried, mass-produced varieties.
- Vegan and Egg-Free Goodness: This particular recipe shines as a egg-free spinach pasta dough, making it perfect for those following a vegan diet or anyone with egg allergies. It proves that you don't need eggs to achieve a wonderfully tender and supple pasta.
- Full Control Over Ingredients: Making your own pasta allows you to choose high-quality flour and fresh spinach, free from unwanted additives or preservatives often found in commercial products. You dictate what goes into your food, ensuring a healthier meal for your family.
- Fun for the Whole Family: The vibrant color makes this pasta incredibly appealing, especially to children who might otherwise shy away from spinach. It's a fantastic way to introduce new textures and flavors in a fun, engaging format. Plus, the process of making pasta can be a delightful family activity!
- Versatility in Shapes: Once you've mastered the dough, the possibilities are endless. These spinach noodles can be cut into traditional fettuccine or linguine, used for luscious lasagna sheets, or even shaped into delicate ravioli or tortellini.
Embracing the process of how to make spinach noodles means embracing a healthier, more flavorful, and more creative approach to your pasta nights.
The Simple Ingredients for Vibrant Green Pasta
One of the most appealing aspects of this spinach noodle recipe is its simplicity. You only need a few core ingredients, plus a couple of optional additions to truly make it your own. Understanding the role of each component is key to achieving the perfect dough.
- Flour: The Foundation
- 00 Flour: This finely milled Italian flour is often considered the gold standard for pasta making. Its low protein content results in a silky, tender dough that's easy to roll and yields a wonderfully delicate pasta. If you can find it, 00 flour is highly recommended for homemade spinach noodles.
- Durum/Semolina Flour: A coarser, high-protein flour often used in pasta, especially for a firmer, chewier bite. A combination of 00 flour and durum/semolina can create a dough with a lovely balance of tenderness and strength.
- All-Purpose Flour: While it will work, all-purpose flour has a slightly higher protein content than 00 flour, which can result in a chewier, less tender pasta. If it's all you have, feel free to use it, but be prepared for a slightly different texture.
- Spinach: The Star of the Show
The secret to vibrant, naturally colored spinach noodles lies in using fresh spinach juice. There are two primary methods for preparing your spinach:
- Juicing (Recommended): For the smoothest dough and most intense green color, feeding fresh spinach leaves through a juicer is the preferred method. This extracts pure, concentrated spinach juice, leaving behind the fibrous pulp.
- Blending & Straining: If you don't own a juicer, you can blend fresh spinach leaves with a tiny amount of water until very smooth. Then, pass the puree through a nut milk bag or cheesecloth, squeezing firmly to extract as much liquid as possible. While this method can work, it requires more effort to achieve a truly smooth, pulp-free juice, which is crucial for a tender dough.
Always use fresh spinach for the best results; frozen spinach tends to be watery and can dilute the vibrant color.
- Olive Oil: For Suppleness and Ease
A touch of good quality olive oil plays a vital role in the dough's texture. It helps to create a more tender, supple, and elastic dough that is easier to knead, roll, and shape. It also contributes to a slightly richer flavor.
- (Optional) Seasonings: Enhance the Flavor
While the fresh spinach flavor is subtle and pleasant, you can certainly add a pinch of fine sea salt to the dough for overall flavor enhancement. For an extra kick, consider incorporating a little garlic powder, onion powder, or a blend of dried Italian herbs directly into the flour for a more aromatic pasta.
With these simple, high-quality ingredients, you're well on your way to mastering how to make spinach noodles that are as delicious as they are beautiful.
Mastering the Art of Making Spinach Noodle Dough
Creating homemade pasta dough is a hands-on experience that connects you with your food. Follow these steps carefully to achieve a perfect, pliable dough for your spinach noodles.
Step 1: Prepare the Spinach Juice
- Thoroughly rinse a generous amount of fresh spinach leaves under cold water.
- Using a Juicer: Feed the clean spinach leaves into your juicer. Collect the vibrant green juice in a measuring cup. Aim for the amount specified in your recipe (typically around 1/2 to 3/4 cup for standard pasta dough recipes).
- Using a Blender (Alternative): If you don't have a juicer, place the rinsed spinach in a high-speed blender with 1-2 tablespoons of water (just enough to help it blend). Blend until you have a very smooth, liquid-like puree. Pour the puree into a nut milk bag or several layers of cheesecloth set over a bowl. Squeeze firmly to extract all the liquid, leaving the fibrous pulp behind. This method requires a strong squeeze and might yield a slightly less vibrant color than juicing.
- Tip for Leftover Pulp: Don't discard the spinach pulp! You can spread it thinly on a baking sheet and dehydrate it (or bake on very low heat) until completely dry. Once brittle, grind it into a fine spinach powder to use as a nutrient booster in smoothies, soups, or even as a natural food coloring.
Step 2: Form the Green Pasta Dough
- Create a Flour Well: On a clean, spacious work surface (a large wooden board or clean countertop works best), mound your chosen flour (e.g., 2 cups 00 flour). Use your fist or the bottom of a bowl to create a large well in the center of the flour, similar to a volcano crater. Ensure the walls of the well are sturdy enough to hold liquid.
- Combine Liquids: Pour the spinach juice and olive oil (and optional salt or other dry seasonings) into the well.
- Initial Mixing: Using a fork, gently whisk the liquids in the center. Slowly, begin to incorporate small amounts of flour from the inner walls of the well into the liquid mixture. Continue this process, gradually bringing more flour into the center until you have a rough, shaggy dough.
- Kneading: Once the mixture is too thick to work with a fork, lightly flour your hands and begin to knead the dough. Push the dough away from you with the heels of your hands, then fold it back towards you, rotating it slightly with each push and fold. Continue kneading for 8-12 minutes. The dough will initially be sticky, but as you knead, it will become smoother, more elastic, and less tacky. It should feel firm yet pliable, like a firm play-doh.
- Rest the Dough: Form the dough into a ball. Lightly dust it with flour, wrap it tightly in plastic wrap (or place it in a sealed container), and let it rest at room temperature for at least 30 minutes, or up to an hour. This resting period is crucial; it allows the gluten to relax, making the dough much easier to roll out and preventing it from springing back.
Step 3: Roll and Shape Your Noodles
- Divide the Dough: After resting, unwrap the dough and cut it into 2-4 manageable portions. Keep the portions you're not working with covered to prevent them from drying out.
- Rolling with a Pasta Machine:
- Flatten one portion of dough with your hands or a rolling pin into a rough rectangle.
- Dust lightly with flour. Set your pasta machine to its widest setting (usually '0' or '1'). Pass the dough through.
- Fold the dough in half or in thirds, rotate it, and pass it through the widest setting again. Repeat this 3-4 times until the dough is smooth and rectangular. This helps to develop the gluten further.
- Gradually adjust the machine to narrower settings, passing the dough through each setting once, without folding, until you reach your desired thickness. For most noodles, settings 4-6 are ideal (medium-thin).
- Lay the long sheets of pasta on a lightly floured surface.
- Rolling with a Rolling Pin (Manual):
- Lightly flour your work surface and rolling pin.
- Roll out one portion of dough, starting from the center and rolling outwards, rotating the dough frequently to ensure an even thickness. Continue rolling until the dough is very thin and almost translucent. This requires patience and a good amount of arm strength!
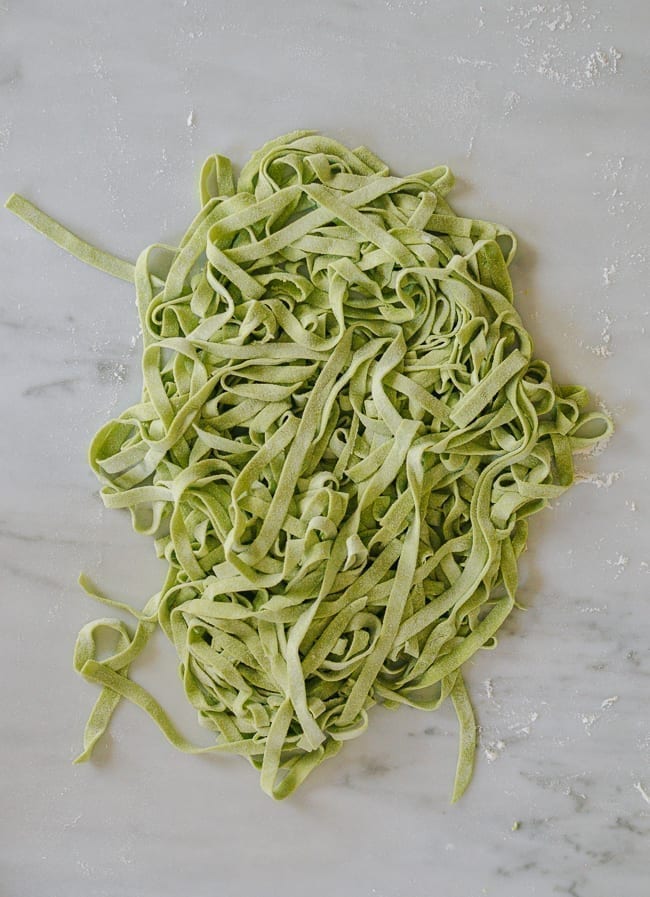
- Cutting the Noodles:
- Once your pasta sheets are rolled to your preferred thickness, you can cut them.
- With a Pasta Machine: Attach the desired noodle cutter attachment (e.g., fettuccine or linguine) and feed the pasta sheets through.
- Manually: Lightly dust the pasta sheet with flour. Gently fold or roll the sheet into a loose log. Using a sharp knife, cut the dough into strips of your desired width (e.g., 1/4 inch for fettuccine, narrower for linguine). Unfurl the cut noodles immediately and toss them lightly with flour to prevent sticking.
- Drying: Lay your fresh noodles in a single layer on a lightly floured surface or hang them on a pasta drying rack for about 20-30 minutes. This prevents them from sticking together when cooking.
Cooking and Serving Your Homemade Spinach Noodles
Cooking fresh pasta is much quicker than dried pasta, so pay close attention!
- Boil Water: Bring a large pot of heavily salted water to a rolling boil. Salt the water generously – it should taste like the sea.
- Cook the Noodles: Add your fresh spinach noodles to the boiling water. Stir gently to prevent sticking. Fresh pasta cooks quickly, typically in 2-4 minutes, depending on its thickness. Cook until al dente – tender but with a slight bite.
- Drain and Serve: Drain the noodles, reserving about a cup of the pasta water. Toss immediately with your favorite sauce. The starchy pasta water can be added to the sauce to help it emulsify and cling to the noodles.
Serving Suggestions:
- Light & Fresh: Toss with a simple olive oil, garlic, and cherry tomato sauce, perhaps with some fresh basil.
- Creamy Indulgence: Pair with a light cream sauce, vegan pesto, or a cashew-based sauce for a richer dish. Roasted vegetables like mushrooms or bell peppers complement the spinach beautifully.
- Classic Pairings: While often associated with lighter sauces, spinach noodles can also be excellent with a simple marinara or a vibrant primavera sauce.
Storage Tips:
- Immediate Use: Fresh pasta is best cooked within an hour or two of making it.
- Short-Term Storage: If not cooking immediately, you can lightly dust the noodles with flour, form them into small nests, and store them in an airtight container in the refrigerator for 1-2 days.
- Long-Term Storage (Freezing): To freeze, arrange the nests of noodles on a baking sheet and freeze until solid. Once frozen, transfer them to a freezer-safe bag or container. They can be cooked directly from frozen; just add a minute or two to the cooking time.
Conclusion
Learning how to make spinach noodles is more than just following a recipe; it's an experience that brings joy to your kitchen and wholesome, delicious food to your table. With just a few simple ingredients and a little patience, you can create a vibrant, nutrient-rich, and entirely vegan pasta that will delight everyone. The subtle earthy notes of spinach, combined with the tender chew of homemade pasta, create a dish that is both comforting and sophisticated. So, roll up your sleeves, embrace the green, and prepare to fall in love with the art of fresh, homemade pasta.
